Have you ever encountered issues with electronic devices, such as solder short circuits on circuit boards? This is a common yet frustrating problem as solder short circuits can cause the device to malfunction.
However, no need to worry! In this blog post, we will introduce you to troubleshooting and solutions for solder short circuits, helping you understand the key steps to repair electronic devices. Whether you're an electronics enthusiast or a repair technician, this information will be helpful to you.
Before delving into troubleshooting and solutions for welding short circuits, let's first understand the concept of welding short circuits. Welding short circuit refers to the solder bridging between two or more electronic components, causing the current to bypass the intended path of connection.
Where do the signs of welding short circuits appear, in the PCB or the PCBA?
The signs of welding short circuits can appear in both the PCB and the PCBA. A PCB is a board with circuits and solder joints, while PCBA refers to an assembled circuit board where electronic components have been soldered onto the PCB.
When a short circuit occurs during soldering on a PCB, the following signs may appear:
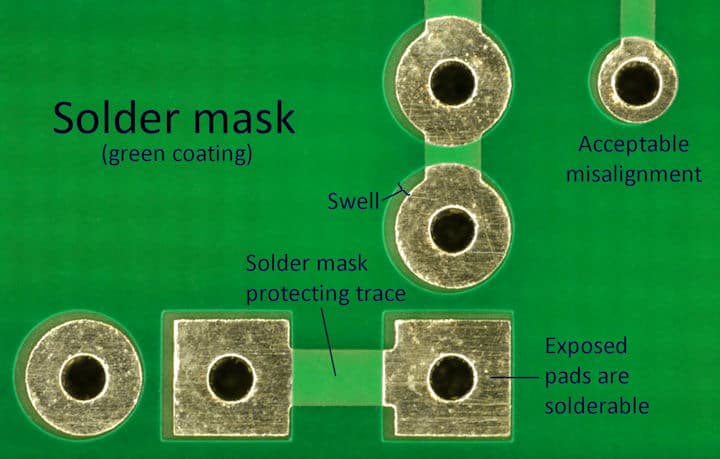
During the soldering process, if excessive solder or technical errors lead to bridging between solder joints, a solder short circuit will occur. This means that there is an additional metal connection between two or more solder joints, causing the current to bypass the intended path. This can be identified by visually inspecting whether there are additional solder connections between the solder joints.
During the welding process, excessive or improper control of the solder may result in the solder overflowing into the surrounding area of the solder joint. This solder overflow can potentially bridge different solder points, causing a short circuit. Visual inspection of the presence of solder overflow around the solder joint can help detect signs of such welding short circuits.
When a welding short circuit occurs on the PCBA, the following signs may appear:
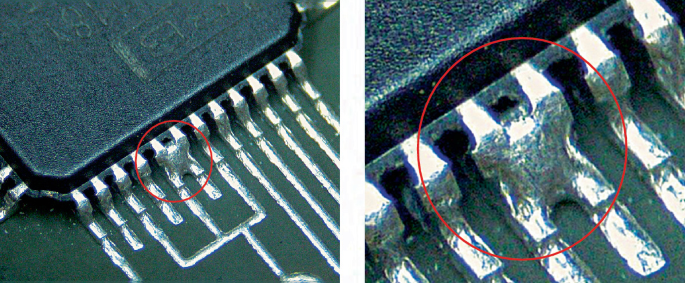
When soldering components, if there is excessive solder or improper separation of the contact between solder joints, it may result in solder bridging between adjacent component pins. In this case, the solder will connect two pins, causing a short circuit. By carefully observing whether there are additional solder bridges between the soldered components, one can identify these signs of welding short circuit.
During the welding process, solder may overflow into adjacent metal areas around the pins, such as the copper traces on a solder pad or circuit board. In such cases, the solder may create conductive contact between the pins and the metal area, leading to a short circuit. By inspecting whether there is any unnecessary contact between the soldered pins and the surrounding metal areas, these signs of welding short circuits can be identified.
Now, let's explore some key steps together to address this common issue.
Part 1: Identifying Signs of Welding Short Circuit
Before fixing a welding short circuit, it is important to first identify the signs of it. This section will introduce some common signs of welding short circuits, such as the equipment failing to start, the generation of smoke or odor, and visual indicators on the circuit board. Understanding these signs will help you quickly pinpoint the issue of a welding short circuit and respond appropriately.
Device cannot start: When you attempt to power on an electronic device and it fails to start or shows no response whatsoever, it could be a sign of a soldering short circuit. Soldering short circuits can disrupt the flow of current, preventing the device from functioning properly.
Generation of Smoke or Odor: During welding short-circuits, current may flow through unintended paths, resulting in the generation of smoke or unusual odors around the solder joint. This is a clear indication of the presence of welding short-circuit issues.
Visual instructions: Inspect the circuit board of the device and pay attention to visible issues with solder joints and connections. Soldering short circuits can lead to solder bridging or solder overflow, creating additional connections and causing a short circuit. You can look for unnecessary metal bridging between two solder joints or contact between touchpoints.
Overheating: Welding short circuits can lead to overheating of certain components, such as capacitors or resistors. When the equipment is in operation, touch these components. If they are unusually hot or emit abnormal heat, there may be a problem with welding short circuits.
Abnormal Functionality or Malfunction: Welding short circuits may result in abnormal functionality or malfunctions of the equipment. For instance, buttons or switches may fail to operate properly, the screen may display irregularities, or the device may not respond correctly to input.
Understanding these signs of welding short circuits will help you quickly identify the problem and take appropriate measures to fix it. If you encounter any of the above signs, you can further troubleshoot to confirm if there is a welding short circuit issue.
Part 2: Preparation and Safety Measures
Before proceeding with repairing a welding short circuit, it is essential to carry out the necessary preparations and take appropriate safety measures. This section will introduce you to the required tools and materials and how to ensure the safety of your operating environment. This includes proper personal protective equipment, selecting and using tools, as well as ensuring the equipment is in a powered-off state.
Tools and Materials Preparation:
First, make sure you have the necessary tools and materials for repairing soldering short circuits. Commonly used tools include a soldering station, soldering iron, desoldering pump, solder, tweezers, magnifying glass, or microscope, etc. In addition, you may also need insulating tape, alcohol or cleaning solvent, cleaning brush, and other materials for cleaning purposes.
Personal Protective Equipment:
Before engaging in any electronic device repair work, always ensure that you wear appropriate personal protective equipment to ensure your safety. This includes safety goggles, anti-static gloves, and anti-static wrist straps. Safety goggles will protect your eyes from potential splashes
of solder or other substances. Anti-static gloves and wrist straps will prevent electrostatic discharge from damaging electronic components.
Operating Environment:
Make sure your operating environment is suitable for electronic device repair work. Ensure that the workspace is clean, tidy, and free from flammable materials. Also, ensure good ventilation in the operating area to remove smoke or harmful gases generated during soldering. Before starting any operation, make sure the power is completely disconnected and unplug the device's power cord.
Device Status Check:
Before starting the repair work, carefully inspect the condition of the electronic device. Ensure that the device is powered off and confirm that all batteries have been removed. Additionally, check for any visible physical damage or burn marks on the circuit board.
Mastering Welding Techniques:
Familiarity with the correct welding techniques is key to successfully repairing welding shorts. Make sure you understand the proper welding temperature and time and acquire proficiency in the correct welding methods. Overheating or excessive welding time can damage electronic components, so ensure that you grasp the appropriate welding skills and parameters.
By following the preparations and safety measures, you can maximize the smooth progress and the reliability of your repair work. Remember, safety always comes first, and if you feel unsure or encounter difficulties during the repair work, do not hesitate to seek assistance from professionals.
Part 3: Troubleshooting Welding Short Circuits
In this section, we will provide a detailed explanation of the key steps to troubleshoot welding short circuits. This includes using a microscope or magnifying glass to inspect the welding joints, methods for clearing welding short circuits, re-soldering or repairing solder joints on the circuit board, and more. Each step will be explained and demonstrated to ensure that you can understand them clearly and execute them correctly.
Examination using a microscope or magnifying glass
The first step is to carefully examine the solder joints using a microscope or magnifying glass. Short circuits often occur when solder bridges to adjacent solder points or wires. By magnifying the view, you can clearly see any abnormal connections between solder points. Look for issues such as solder bridges, excessive solder, or shorted pins.
Methods for removing solder short circuits
Once a solder short circuit is identified, the next step is to take measures to remove it. You can use some tools and techniques to address this issue.
Firstly, you can use a fine solder wick or solder sucker to gently remove excess solder. Make sure to completely remove the solder from the shorted solder points. If there are larger solder bridges, you can carefully separate them using soldering braid or wire. Be cautious in your handling to avoid damaging surrounding components or solder points.
Re-soldering or repairing solder joints on the circuit board
After clearing solder shorts, there may be a need to re-solder or repair solder joints. Solder shorts can result in poor or broken solder joints, requiring them to be reconnected. Using the appropriate solder and soldering tools, heat the solder to the appropriate temperature and apply it to the solder joints that need to be connected. Ensure good soldering quality with no shorts or connection issues between the solder joints.
If any damaged or detached solder joints are found, it may be necessary to repair wires or pads on the circuit board to ensure circuit integrity.
Perform a final visual inspection and testing
After completing the re-soldering or repair of solder joints, conducting a final visual inspection is crucial. Use a microscope or magnifying glass to examine the solder joints again, ensuring there are no remaining solder bridges or shorted pins.
Also, inspect the appearance and connectivity of the solder joints to ensure good soldering quality. After completing the visual inspection, proceed with necessary circuit testing and functional verification to ensure the effectiveness of the repair work.
After completing the troubleshooting of the welded short circuit, the next important step is to test and verify the effectiveness of the repair.
Part 4: Testing and Verification
In this section, we will discuss how to conduct testing and verification to ensure the successful resolution of welding short circuit issues. This includes using testing instruments and tools to verify the connectivity of circuits, checking the functionality of other related components, and so on. Through testing and verification, you can ensure the effectiveness of the repair work and ensure that the equipment functions properly.
Using Testing Instruments and Tools:
Firstly, you can use various testing instruments and tools to verify the resolved welding short circuit issue. For instance, you can use a multimeter to test the circuit's continuity and resistance values. By measuring various critical nodes in the circuit, you can ensure that the welding short circuit has been successfully eliminated, and the current can flow in the correct path.
Inspecting Other Relevant Components:
In addition to welding short circuits, it is also important to inspect other potentially affected components. For example, the welding short circuit may cause certain components to overheat or become damaged. Therefore, carefully examine and test the surrounding components to ensure they are functioning properly. If any other faults or damage are discovered, appropriate measures should be taken to repair or replace those components.
Conducting Functional Testing:
Next, perform functional testing to verify if the repaired electronic device is functioning properly. Depending on the type and characteristics of the device, you can perform various functional tests.
For example, if it is an electronic device, you can verify if each functional module is operating correctly, if buttons and switches are responsive, if the display screen shows the correct information, and so on. Through comprehensive functional testing, you can ensure that the repaired electronic device operates as expected.
Conducting Long-Term Testing:
After repairing the soldering short circuit, it is a good practice to conduct a prolonged period of testing. Allow the device to run continuously for a period and observe if there are any abnormal behaviors or malfunctions. This long-term testing helps identify potential issues and validates the stability and reliability of the repair.
User Acceptance Testing:
Finally, if possible, you can hand over the repaired equipment to the end user for user acceptance testing. This ensures that the repaired device meets the user's needs and expectations. The user can use the device for actual operations and provide feedback and opinions. This will help further improve and optimize the repair work.
Through the testing and validation phase, you can confirm that the welding short circuit issue has been resolved and the repaired electronic device is functioning properly. These steps not only ensure the effectiveness of the repair but also provide you with confidence in the device's performance and reliability.
Through this blog post, we have learned about troubleshooting and solutions for welding short circuits, as well as the key steps to repair electronic devices. Whether you are an electronics enthusiast or a repair technician, this knowledge can help you better deal with welding short circuit issues and fix your electronic devices.
Remember to always take appropriate safety precautions before performing any repair work, and if you feel unsure, seek assistance from professionals. Wishing you a successful repair and enjoyment of your electronic devices!
Experience Top-Notch PCB Support with SprintPCBCount on SprintPCB, the leading high-tech enterprise, for all your PCB manufacturing needs. Our one-stop services cater to clients worldwide, ensuring a hassle-free process at competitive prices. Streamline your operations and reach out to us now to explore the myriad ways in which we can support your organization.